
Interface overview
After launching NebulaAuth, you will see the main application window. It is divided into several logical areas, each responsible for a specific task. Below, we will go through them in order.
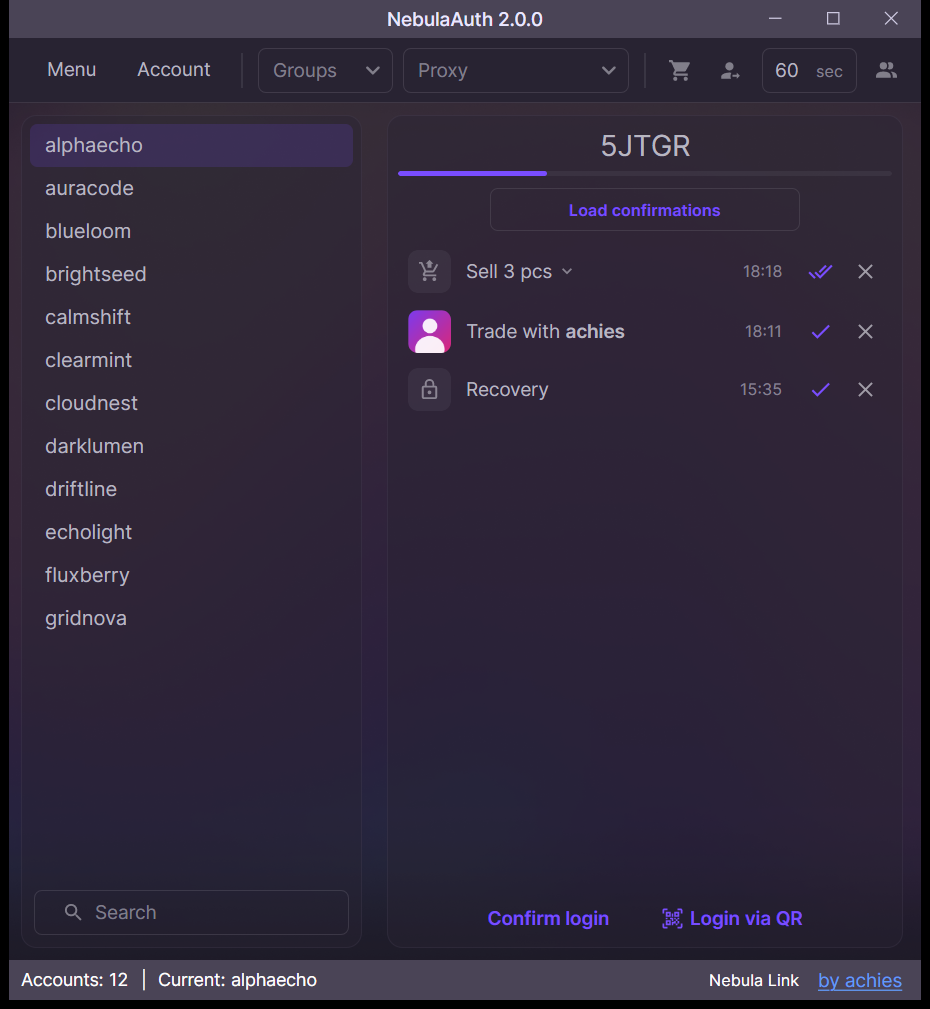
🧭 Control panel, top section
At the top of the window, there is a panel with the menu and controls.

Menu
This menu contains the main actions related to maFiles and application settings:
- Import — add maFiles to the application
- Remove — remove the selected maFile from NebulaAuth
- Open folder — open the folder where maFiles are stored
- Proxy manager — open proxy management
- Settings — change the language, appearance, and behavior of the application
Additional functions are available in the "Other" section:
- Set passwords — set passwords for several accounts at once
- Export — save maFiles to another folder with the required options
"Account" menu
This menu contains actions for Steam accounts:
- Link — create a new Steam Guard for the account
- Move Steam Guard — transfer Steam Guard from your phone to the computer
- Unlink — completely remove Steam Guard from the account
- Refresh session — try to refresh the account session without a password
- Login — log into the account again if the session is outdated
- Open in browser — open Steam signed in as the account, see Steam browser
Groups
This field is used to select or create account groups.
If you have many accounts, you can combine them into groups, for example: "Main", "Farm", "Trade".
- When a group is selected, only accounts from it are displayed in the list
- To create a new group, enter its name and press Enter
More details: Account groups
Proxy
Here you can view or select the proxy assigned to the current account. To assign a proxy, create it first in Proxy manager from the menu. After that, it appears in this list.
An indicator may be displayed next to the field:
- Yellow circle — the default proxy is used
- Red circle — the proxy is specified in the maFile, but is missing in the application
Hover over the indicator to see a tooltip with more details.
More details: Working with proxies
Auto-confirmation timers
Two switches control automatic confirmations:
- "Cart" — confirmation of sales and purchases on the Steam Community Market
- "Person with arrow" — confirmation of trades
Next to them is a field for the check interval, in seconds. The application checks for new confirmations at that frequency.
By right-clicking the switches, you can enable timers for the entire group of accounts or for all accounts at once.
More details: Auto-confirmations
Show accounts with auto-confirmation
The button with the Accounts icon on the right.
When enabled, the account list shows only accounts with active auto-confirmations.
👥 Account list, left section
The left side of the window shows all added accounts. Each account is listed by its login.
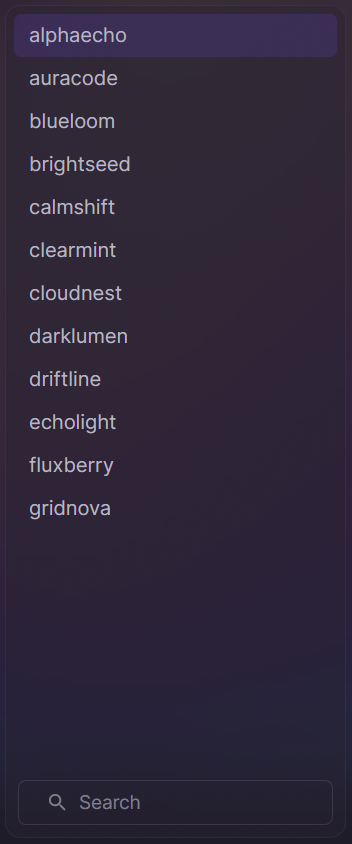
At the bottom of the list there is a search field. You can search for accounts by login or SteamID, which starts with 76....
Account context menu
Right-clicking an account opens a menu:
- Open in browser
- Copy login
- Copy password
- Copy SteamID
- Copy maFile
- Add to group, including creating a new group
- Remove from group
- Unattach proxy
- Assign free proxy
- Connect to Nebula Link, when Nebula Link is connected
🔐 Codes and confirmations, right section
The right side of the window lets you interact with the selected account.
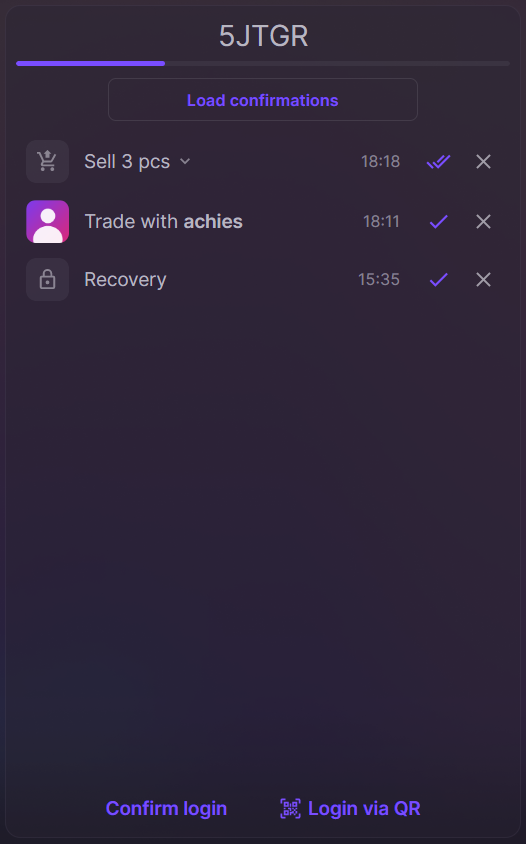
Confirmation code
The current Guard code is displayed at the top. Click it to copy it.
Under the code, a time indicator shows how many seconds remain until the next refresh. The code changes every 30 seconds.
Load confirmations
This button loads confirmations from Steam servers.
Confirmations appear only after an action that requires them, for example a trade, sale, and so on.
After loading, confirmation cards appear below. You can accept or reject them.
Confirm login
This button is located in the lower part of the panel.
Used to confirm a login to Steam from a new device:
- if there is one request, the login is confirmed immediately
- if there are multiple requests, the button will not confirm any of them
In that case, confirm the login manually through the confirmation list.
Login via QR
The button next to Confirm login. It approves a Steam login by a QR code copied to the clipboard.
More details: Login by QR code
ℹ️ Bottom panel
Service information is displayed at the bottom of the window:
- the number of loaded accounts
- the name of the selected account
- the indicator of skipped files, when there are any
- the Nebula Link button, see Nebula Link
- the by achies link to the official source and project author, where you can also check for updates
What's next?
Now that you are familiar with the interface, you can move on to the main application features.
To start working with accounts, we recommend reading the sections: